Wednesday, August 31, 2011

Baby Food 101 - Tutorial

*Sigh*  My baby girl is growing up.  I took her for her 9 month pictures on Sunday.  Granted they were horrible as it was too close to nap time and she didn't smile in a single one, but I will still cherish those photos of her quickly passing first year.  One thing that I have done with both my girls is make their own baby food.   I would like to say I started doing it because I only wanted the most nutritious, organic, and fresh food to grace their perfect lips.  In actuality I just did it because it was easy and less expensive.  And I finally had someone in my household who would not complain about what I was serving for dinner!  Emily's daycare provider, Donna, got me started with the basics and then I let my imagination and what was in season do the rest.  With Lindsay nearing the one-year mark, my baby food making endeavors will soon come to a close.  Since Matt does most of the cooking, you think I would be happy with one less thing to do, but I'm not!  Since breastfeeding didn't work for me (let's leave that story for another blog post), this has been a way for me to feel connected with Lindsay and that I'm directly providing for her.  I know this is all in my head as she doesn't care or feel any more connected with me when eating from a can or the Magic Bullet but it makes me feel good so that's all that matters!

Here's a quick tutorial on how to make your own baby food. 

I went to Harris Teeter and got a bunch of different vegetables and fruits.  Enough to satisfy my little foodie for a couple of weeks.    


I like to get the prep work done first so I can have fun making lots of noise blending stuff with no interruptions later.  Peel fruits such as apples, pears, sweet potatoes, carrots, etc.  Some people like to make their baby food with the peel on since it contains the most nutrients.  I've found its pretty hard to get these chopped little enough so my babies wouldn't choke on them.  Dice and steam the vegetables.  Fruit rarely has any prep work other than peeling.


Such a pretty artist's palate!  Have fun mixing the different fruits together (as long as your little one has already had them before).  Always introduce new foods by themselves so you can judge if they have an allergic reaction.   

Puree fruit in food processor.  I am partial to the Magic Bullet and absolutely love the small portions in allows me to make. It's also nice being able to keep the cap on and pop it in the fridge if I know I am going to use it later that day.  Then spoon the mixture into ice cube trays.  Each ice cube space is about one ounce.
Pop them in the freezer. 


The vegetable artist's palate!  Please note that if you put carrots in the Magic Bullet, not much is going to happen.  You have to add water to most vegetables as they lack the amount that fruit naturally has.  To me this allows for so customization according to what stage your child is in.  For young eaters, add enough water for it to be very diluted or for those with a few teeth, have the food a little more thick.  I just add a little at a time until I get where I want the consistency be. 


Once frozen, pop out the individual cubes, ziploc bag them, and label with what food it is and when you made it.  You can keep baby food frozen in the freezer for about 3 months.  In the mornings I take out 2-3 cubes, put it in a Tupperware and let it thaw in the fridge for dinner.  Voila!

Tuesday, August 30, 2011

The Simple Things

It's the simple things in life that matter and make life worth living.  Like playing in puddles after a rainstorm.

Or being a boy and hitting things with sticks.


Or knowing you married the right man when he makes your daughter an "L" pancake for Lindsay.  Just because.


Friday, August 26, 2011

Apple for the Teacher - Part 2

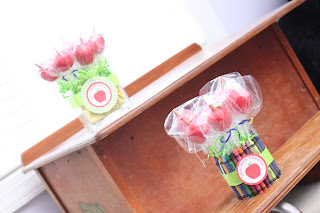
Emily was able to help me deliver her teacher presents today.  They were so cute and so easy!!  I didn't do a tutorial but here is a step-by-step for my inspiration from a pencil vase.  For these below, I took an edge safe small can (the condensed milk can from the peanut butter pie last weekend) and hot glued crayons around it.  I then added floral foam, the apple cake pops and some shredded crinkle paper for decoration.  I downloaded FREE printables from Shindig Parties to Go for the tags and hot glued that on to some green ribbon.  I really like hot glue!!


I wanted to do something a little bit more individualized for Emily's 2-year-old class teachers.  A thank you for all their had work throughout the year and help with the transition.  I went to Michael's and purchased $1 unfinished frames and painted these with chalkboard paint.  Very "teachery".  Like how I just make up words?!  I only wish I had the forethought to take pictures with each teacher.  Oh well, maybe next year.


Thursday, August 25, 2011

End of Summer Party - {Blog Mash}

Where did the summer go?!?  I feel like I say that after every season - Where did the holiday season go?  Where did the Spring go?  Where did 2010 go?!?  I can't believe that next weekend is Labor Day and the unofficial end of summer.  I love the idea of a party to celebrate all the wonderful things that summer is about - watermelons, ice cream, suntan oil, and all things BBQ.  Here are some ideas from the blogging world to make the perfect end of summer party.

What's cooler than having a nice refreshing drink on a hot day?  Getting a nice refreshing drink out of a spigot watermelon!

 
Source
Source
Love both of these summer essential invitations.  And both can easily be DIY.

Source
Strawberry whipped butter.....sounds interesting.

Source
Source
Every summer party worth its salt has to have fun summer activities for the kids.  I love the two below.  The first picture is "make your own ice cream in a bag" from Kara's Party Ideas.  The link has a tutorial if the idea of ice cream in a bag is as confusing for you as it was for me!  The second great summer game is outside Twister.  What a great ice breaker for those neighborhood BBQs!  Just add spray paint and some flexible people and you got a party!

Source

Source
Source
Source

I love serving ice cream but since you have to keep it in the freezer, I can never make a pretty display.  This solves that problem and guests get individual portions so no getting the ice cream scoop stuck or waiting in line.  Love it
Source

Wednesday, August 24, 2011

Apple for the Teacher

I think I am slightly obsessed with cake pops now.  I decided last Friday that I wanted to create a teacher's gift for Emily's 2-year-old class teachers as a thank you, a gift for Emily's new 3-year-old teachers as a welcome, and a gift for Lindsay's nanny, Donna.  She is a baby whisperer - she deserves lots of thank you presents. 

Anyways, cake pops are cute, highly customizable, taste great, look classy in display, and aren't that hard to make!  have to admit there was a learning curve which my pictures will definitely attest to but I now have to buy Bakerella's "Cake Pops" book.  You can also check out her website for tutorials and recipes.  I even dreamed about them last.  I kept imagining all the cute little characters I could create and the parties I could plan AROUND them.  For example, how cute would a sheep, pig, chick cake pops be at a farmyard kids party?  Precious, right?! Now if I just find a place that sold the candy coating in bulk I would be one happy girl. 


Below is the first cake pop I tried.  It did not turn out pretty.  I didn't even bother to stick the pretzel stem in it.  Matt enjoyed tasting the mistakes though!  


Such a more appetizing end product! 


Add an Air Head green "leaf", wrapping and ribbon and you have one cute Apple! 


Monday, August 22, 2011

Accessorize Your Door

I'm big into what I like to refer to as door accessories.  I like this better than wreaths as you don't box your creativity into a circle!  Right now my door is bare as I'm over my what I've had up all summer but I'm not quite ready for Fall yet.  (Until it gets below 95 degrees I can't decorate with browns and oranges).  I love all the DIY wreaths I am finding in the blogging world.  A lot of these have tutorials attached with the image so click on "source" to check it out.  Hmmmmm......which one will be my next project.......       
Source   
Source
Source
Source
Source
Source
Source

Saturday, August 20, 2011

A Peanut Butter Pie for Mikey

I had planned to make cake pops this weekend for Emily's teachers but as I was doing my usual pursuing of the internet instead of laundry, I came across blog called In Jennie's Kitchen.  Her husband passed away unexpectedly last week.  She shared some of her last memories and her pain with the blogging world.  I was in tears watching this video of Mikey and his daughter dancing shortly before he died.  Last Friday she requested that everyone make a creamy peanut butter pie for someone they love.  Peanut butter pie was Mikey's favorite.  I googled Mikey's Peanut Butter Pie and was AMAZED at what came up. It seems Jennie's story has touched the heart of many and the internet community has responded and offered up hundreds if not thousands of peanut butter pies in honor of Mikey.  Myself included.
I think this story has resonated with so many people because it reminds us of how fragile life is.  We always think something like that won't happen to us or at least won't happen to us while we are so young.  No one knows what God's plan is and sometimes life takes us down paths that aren't expected and frankly we don't like.  I lost my own father seven years ago and I pray for Jennifer and Mikey's girls.  There will be many tough days for them ahead and I know the pain they will feel when there father is not there for those big moments in their lives - marriage, children, holidays.  My heart goes out to them and I will hug my own girls a little tighter tonight and give Matt extra kisses.  I wish for everyone to continue showing Mikey and Jennifer love by making your own peanut butter pie.  Give those you love a hug and tell them how much you love them.    

I tweaked Jennie's Creamy Peanut Butter Pie recipe to fit what I had in the pantry.  It is now Matt's favorite pie:

Creamy Peanut Butter Pie

prepared chocolate pie crust
3 ounces chopped unsweetened Baker's chocolate
20 caramel candies
1 cup heavy cream
8 ounces cream cheese
1 cup chunky-style peanut butter
1 cup confectioner's sugar
1 14 oz can sweetened condensed milk
1 teaspoon vanilla extract
1 teaspoon freshly squeezed lemon juice

Melt chocolate in a double broiler or microwave.  Pour over bottom of cookie crust making sure it goes all the way to the edges.  Melt caramels according to bag in microwave (I usually add milk instead of cream).  Pour melted caramel on top of chocolate over cookie crust.   Place pan in the refrigerator while you prepare the filling.

Pour the heavy cream into a bowl and beat using a stand mixer or hand mixer until stiff peaks form.  Transfer to a small bowl and store in refrigerator until ready to use.  Place the cream cheese and peanut butter in a deep bowl.  Beat on medium speed until light and fluffy.  Reduce the speed to low and gradually beat in the confectioner's sugar.  Add the sweetened condensed milk, vanilla extract and lemon juice.  Increase speed to medium and beat until all the ingredients are combined and filling is smooth.

Stir in 1/3 of the whipped cream into the filling mixture (helps lighten the batter, making it easier to fold in the remaining whipped cream).  Fold in the remaining whipped cream.  Pour the filling into the prepared pie crust.  Drizzle extra semi-sweet chocolate or caramel on top if you wish for garnish.  Refrigerate for three hours or overnight before serving.  


Friday, August 19, 2011

Cake Pops

Hallelujah!  The weekend is FINALLY here!  With a work conference last weekend I feel like I have been working forever.  I am so looking forward to a little downtime with the family at home.  Emily has a swim lesson and her first ballet lesson on Saturday so I still do have a few things scheduled.  At least those are hopefully fun things.  I just bought Emily's first pair of ballet shoes yesterday and I swear I wanted to cry!  They were so little and adorable.  Is it sad that as soon as I saw them, I thought of a craft?
source

My goal this weekend is to make teacher gifts.  Emily just started in the 3-year old class at preschool and I want to butter her teachers up.  Ha!  I do want to give her old teachers something as a thank you and her new teachers as a welcome gift.  I can't leave out Donna who is Lindsay's daycare person.  I don't know what I would do without her.  She helped get both of my babies on a regular nap pattern and therefore gave me back my sanity.  LOVE HER!  Anyways, I have had this cookbook from the library that I have obsessively flipped through and planned all sorts of things around the recipes.....but haven't tried anything.  Crunch time as the book is due back so this weekend I will be making (drum roll, please) -

CAKE POPS!


The cookbook is by the fabulously popular Bakerella.  I love everything she does and her blog is awesome!  I have decided to make the apple cake pops (fitting for a teacher, right?).  I will let you know how my endeavor turns out.  To be continued...... 

Thursday, August 18, 2011

Blogging

This is turning out to be harder than I thought.


Not to toot my own horn, but I've always been pretty creative.  Do people even say "toot my own horn" anymore?  Maybe that has fallen along the same wayside as "smartie britches" and "knee high to a grasshopper".  Maybe it was my frugal upbringing but I've always had a "I can make that" attitude.  I love seeing pictures of things and then trying to recreate.  Most of the time it doesn't live up to my expectations but the point is I tried, right?  I truly enjoy trying new crafts and get a great sense of accomplishment when something I make is appreciated by myself and/or others.

Which is why I thought this blog idea was a no-brainer.  I love parties, crafts and all things creative.  I even work in the corporate event planning world!  The problem is not the subject matter but the time.  The time to try all these crafts and chronicle it.  I simply have too many ideas and not enough time!  I've also finding it hard to focus.  I see soooo many projects that I want to complete.  It doesn't matter to me that I currently don't know how to sew - maybe that's just another adventure waiting to happen.  Ha!  My husband is going to so hate this blog!!  

Personality - Another problem I'm having in the blog world is I don't feel like I've actually represented myself on here or that you have any idea the type of person I am.  Granted originally I had planned to only post crafts and parties but I'm starting to feel that is a little hollow.  I want you to know me and if instead of writing about some nifty footprint craft I did with my daughter, I want to write about making jello shots that day since my boss yelled at me at work, so be it!  Or maybe I just want to gripe about how much trouble I'm having with Lindsay teething or Emily potty training.  Or how my friends are the best as they always help with anything I ask and my husband is a saint since he let me have a girls night even after staying up with the kids until 1am the night before.  I'm still going to focus on parties & crafts but I will share my personal struggles and triumphs along the way.  I hope you enjoy the ride!       


Wednesday, August 17, 2011

North Carolina Belle Baby Shower

I was lucky enough to be pregnant with Lindsay at the same time as two of my best friends this past Fall.  All three children were due two weeks apart but God had a different plan in mind.  Lindsay came one month early, Cecilia was right on her due date and Brenner was two weeks late.  Just shows there are always surprises in life!  Kelley and I met during college and lived together with our other best friend Missy for three years.  Much to my dismay, Kelley decided to be an adult and leave the nest for California a year or so after graduating.  Even though I hated her being a few time zones away, she did make the best of it and met her other half.  I was THRILLED to plan Cecilia Belle's shower a few years later with our other besties from college.  Since she (to my great excitement!) decided to move back to the wonderful state of North Carolina, I knew that Cecilia was destined to be a Southern Belle.  Why should her first party say any less?!

It's a little hard to see but the inside of this diaper wreath has a pillow that says "North Carolina Princess".  As soon as I saw it, I knew it would be perfect for the shower!  


North Carolina might not have a claim on monograms but they are definitely Southern so Cecilia's monogram showed up in quite a few decorations.  They even graced the Moon Pies that guests took home as favors.


Everything on the menu had a little North Carolina flair - pimento cheese sandwiches, Krispy Kreme doughnuts, sweet pepper relish dip & crackers, and classic North Carolina style BBQ sliders.  We even had Cheerwine and Sundrop to drink! 


As a party activity, all the guests decorated onesies for Cecilia with ribbon and paint pens.  Some of our friends are pretty creative! 


Related Posts Plugin for WordPress, Blogger...